Would you love to have a traditional greenhouse but your budget and schedule prevent you from making it a reality? Are you confused by the all the choices and packaged kits on the market? What if I told you that you can build a greenhouse for the price of four hanging flower baskets? I also made raised beds in one day on the cheap and they’re still going strong. My kids and I sit on the edge of the beds and snack on alpine strawberries, sorrel, spinach, borage flowers and other treats in the dead of winter, making it feel like spring instead.
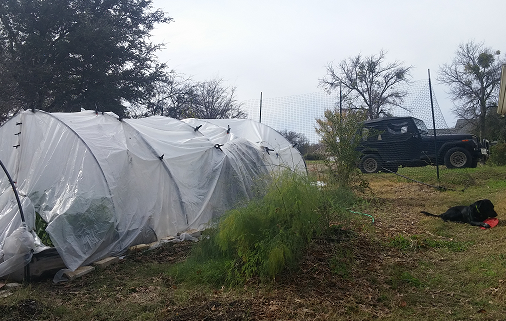
We made this 12-foot by 20-foot greenhouse frame using rebar, rope, pipe sections and irrigation hose. It has lasted through high winds (tornado watches) and all sorts of crazy weather. You can get all the supplies at the local hardware store. If you follow the tips we provide here, you can create your own greenhouse in a day. Forget about plastic PVC pipe frames. Those will snap and blow down, maybe even take flight across the neighborhood!


How Simple Is This?
This design requires NO wood, NO nails and NO power tools. It’s more accurately called a high tunnel. You can stand upright in it unless you are more than six feet tall. I learned about the concept from studying the practices of Eliot Coleman. He gardens year round in the United States up North in Maine. In a nutshell, 6 long pieces of rebar simply bend over and fit inside 12-inch pipe pounded into the ground. Irrigation hose covers the rebar to prevent the plastic (or cloth) from ripping on the rough edges of the rebar. This structure works well in the summer with shade cloth on top to cool the soil and protect plants from sun scald.
Other Options
Frame supplies cost approximately $68, hundreds less than greenhouse kit frames and a lot stronger than most frames sold on eBay and Amazon. Be careful with “greenhouses” sold online that come with quick setup frames and covers – read the reviews. I’ve spent a lot of time comparing models and decided they were not worth the cost. Many people reported that they ended up shredded and bent the first season.

How Does It Work?
If you live in a cold climate, get fall crops growing before the freeze so that the high tower becomes an insulated space. This is called overwintering. Certain crops will grow a bit during the colder months but for the most part, the crops you’ve already started in late fall will remain protected from frost and harsh winds for harvest throughout the cooler periods.
In the spring, you can start plants sooner. When the weather heats up, use shade cloth to shield greens and other tender vegetables and fruit. Once tomatoes have been pollinated, a little cloth above will work wonders in extreme heat.

Minimalistic
Lack of wood framing gives it a lighter appearance. I can quickly dismantle it in a few years when we move. It’s easy to remove part of the plastic cover when spring rolls around. I can use a portion of the greenhouse to start seed.

A Special Place
The greenhouse we constructed is not on level ground. It extends down a slight grade. I elected to plant an herb garden in the front area and added some stone remnants to make a seat and a place to rest a notebook and a glass of iced tea. I can sit there and look down through the length of the greenhouse and plan, admire what’s growing or daydream.
It feels great to go into the greenhouse on a chilly day, and if the sun is shining, it’s warm and peaceful inside – a cure for the wintertime blues.

DIY GREENHOUSE INSTRUCTIONS:
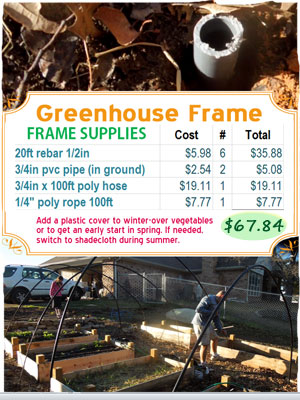
Greenhouse Frame Supplies
Acquire the supplies in the image above to make the frame. You need a truck and a long bed and secure ties to transport the 20ft rebar pieces. If you can negotiate free delivery, wonderful! For the pipe that will go into the ground that holds the curved rebar, we reused PVC pipe already on hand. If you do not have any scraps of PVC pipe you will need (2) 10 foot lengths. We bought only one, saving some on the budget. If you will be cutting the PVC pipe, you’ll need a small hand saw.
Measure and Install the Greenhouse – Please read before you take action.
- CREATE PVC PIPE PIECES FOR THE GROUND: Cut the PVC pipe that will go in the ground. Create (12) 12 inch pieces. If you can get someone to cut them for you, all the better!
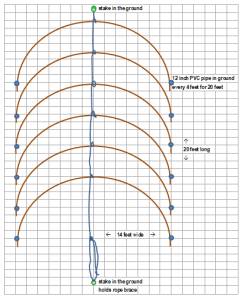
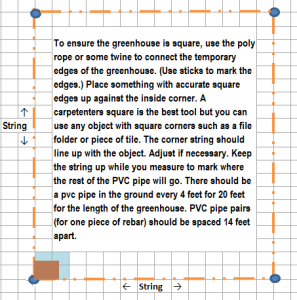
- MEASURE AND MARK THE GREENHOUSE AREA: Measure and mark the ground with sticks or stakes where the 12 inch PVC pipe will go. You will need 6 pieces of PVC pipe on each side of the greenhouse. Decide where one edge of the greenhouse will go. Mark the ground with a temporary stake. Measure 14 feet to the other side of the greenhouse and mark the ground where the other PVC pipe will go. This indicates one end of your greenhouse. Measure 20 feet on both sides to the opposite end of the greenhouse and temporarily mark both edges. Now you have the points of a rectangle. Each corner of your greenhouse should create a 90 degree angle. To check, connect your temporary points with rope. You will use the rope later to brace the greenhouse so do not cut it. Use a carpenter square (file folder or piece of tile) to verify that the inner corners do indeed create 90 degree angles. Adjust as necessary.
- INSTALL THE IN-GROUND PVC PIPES: Once you have marked the corner points with temporary stakes pound the inner pipes into the ground with a mallet or rock at 4 foot intervals as indicated in the diagram below. Use the rope outline as your guide
- COVER THE REBAR WITH IRRIGATION PIPE: Cut (6) 16.5 foot sections of the irrigation pipe Insert each piece of rebar into a section of irrigation pipe.
- INSTALL THE REBAR HOOPS: Place the rebar on the ground near each corresponding pair of PVC pipe. The person that lifts the rebar (with gloved hands) should be strong. Or use two people. Carefully lift the rebar and place one end into one PVC pipe in the ground. Recommend small children stay clear. Keep the rebar stabilized as you carefully follow the rebar with gloved hands across to the other side while gently allowing it to form into a curve, then insert the opposite end of the rebar into the PVC pipe. Your greenhouse is almost finished!
- INSTALL THE ROPE BRACE: Your greenhouse needs bracing at the top to keep it stable during high winds. Place one permanent and strong stake 6 feet from each end of the greenhouse. Attach the rope to the stake on one end and loop it around each rebar hoop until you get to the other end. Tighten the brace by forming a knot.
 Plastic


I’ve tried both 6mil and 4mil plastic from the hardware store and they both worked well. The 4mil held up as well as the thicker stuff. I thought about more expensive greenhouse film but for now, the large rolls pieced together with heavy duty clamps work fine.
The front of the greenhouse does not have a traditional door so you do not need any wood. Instead, I extend the plastic to a point on the ground, something like a candy wrapper and lift up the ends for ventilation. I do not like the look of a wooden frame in the front of a greenhouse. I enter through the end that receives the least amount of direct wind. I hold down the edges of the plastic with heavy pipe, metal fence posts and rocks – whatever I have around that is heavy enough to keep the plastic down. In France, the plastic edges are buried in a trench (as per Eliot Coleman’s book). My ground is too hard to trench out. Sandbags would also work.The chart does not show specs or costs for plastic sheeting. You have a few choices.
- A giant roll of plastic measuring 20 feet by 100 feet will cost you approximately $75. This will give you the extra you need on each end to keep the plastic in place. With a 20′ x 100′ piece of plastic you will have one foot of extra plastic on each side to secure down with rocks, pipe, sandbags or fence posts.
- Piece together smaller sheets of plastic. Great quality duct tape will stay put through the winter unless the greenhouse takes on heaps of snow and stretches too much. I bought three sheets of 4 mil plastic measuring 20 feet by 25 feet each. I connect them with heavy duty clips creating a sheet that measures 60-feet by 25 feet. Cost: about $51.
- Investigate costs for greenhouse film and decide if it is worth the investment.
Lessons Learned
- In stormy weather, the greenhouse plastic will billow up and down. To prevent the plastic from pulling itself around in high winds, next season I will install rope in a criss-cross pattern over the greenhouse. That small extra step will probably prevent some of the edges of the plastic from occasionally pulling loose.
- It is good to not have an air tight seal with the plastic. More airflow this year has resulted in healthier plants.
- It’s still challenging to start kohlrabi, broccoli and other cool weather vegetables early enough so that I have ample supply ready to harvest during winter. This shot below shows lots growing on New Year’s Day, including spinach, cilantro, borage, lettuce, kohlrabi, broccoli raab, tomatoes (last harvest), alpine strawberries, carrots, tatsoi, cabbage, Brussels sprouts and various herbs. See our list of deer resistant herbs here.
- The side of the greenhouse that gets the most wind is the one that needs the most attention. Once one side become loose, the plastic will shift and wiggle loose from even heavy rocks.
- Do not enter the greenhouse on the windy sides. Plan to enter on the calmest side.
 Also see how I build the raised beds in a day! Learn how I make my own organic fertilizers with stuff around the house.