
GOTTA HAVE A GARDEN! We just moved to a new house and there are plenty of repairs and errands to tackle. Some would have to wait! I need a garden
NOW!
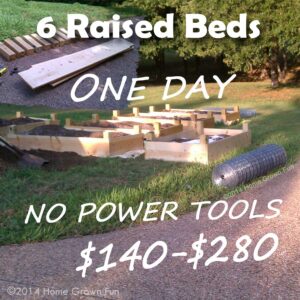 THE GOAL: Build 3-6 simple raised beds IN ONE DAY without power tools, or a truck, or another human to help.

THE BUDGET: $240. This is the amount of money I made selling some of my composting worms and plants before we moved! I can justify ANYTHING!
THE PLAN: I headed out to compare prices and figure out what would fit in my vehicle. By researching out in town I always end up with new and improved ideas.
I noticed premade beds on the shelf but they are expensive for what you get, small and shallow. I decided to build the beds myself using the the cheapest planks I could find. Normally I would scour the Internet for used goods, but there was no time. The sooner I tackled this project, the better!
I started doodling out a plan in the middle of the hardware store. Since our truck was still at the old place I settled on six-foot-long beds. The cut lumber would fit in my medium-sized SUV. Sure, I could rent a truck but that adds to the cost and takes more time.
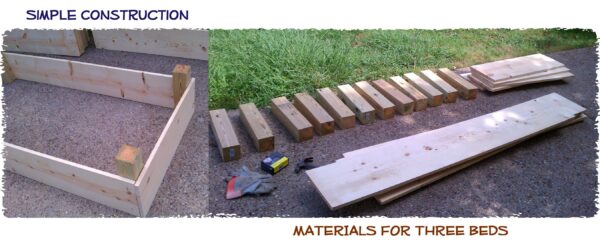
 COST OF WOOD: First I visited the home improvement center to price out boards. Common pine boards would be the least expensive option compared to cedar or redwood. After analyzing the cost of the pine boards at different lengths, it was obvious I would save money if I cut larger boards in half.
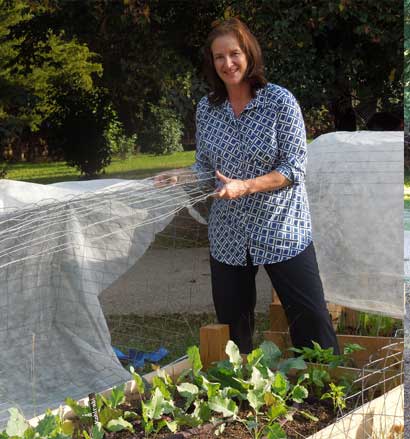
Fence posts for the corners would work well. Posts that stick up higher than the sides make it easy to attach hoop houses and trellis systems. Unfortunately, the store would not cut fence posts, even untreated ones (no saw fit for the job). I visited their competitor and they had no problem cutting the posts. I simply gave the nice associate my list of items and he had everything cut and stacked on a cart in 15 minutes. Go get your materials early in the morning and you’ll have the rest of the day to build. Don’t forget nails. See the plans below.
PINE, CEDAR OR REDWOOD: I chose pine because it is the cheapest option (other than free or used material). I know what you might be thinking. Redwood and cedar will last longer than pine. Yes, that is true, but these woods are significantly more expensive. If I can get 3-5 years out of pine raised beds I’ll be satisfied. My garden is not a showpiece so the LOOK OF PINE IS FINE!
HERE’S HOW YOU CAN MAKE SEVERAL RAISED BEDS IN ONE DAY, WITHOUT POWER TOOLS OR HELP FROM ANYONE!
Review the estimates and costs below. Based on your budget, size preferences and land availability, choose a plan from the four options. Print out the plan and take a trip to the home improvement store. Find the nicest associate on the floor (preferably in the lumber department) and kindly ask them if they can help you find and cut the wood for the raised beds. Show them the plan and make sure they can cut fence posts. Use untreated wood and posts.

Save tons of money by sourcing low cost or free scrap wood from friends, lumberyards or online classified boards such as Craigslist.org.
Build Those Beds!
 BUILD OPPOSITE SIDES FIRST

- ORGANIZE MATERIALS: Place them near your work area so you don’t have to walk far to get the next piece.
- ATTACH THE LONGEST BOARDS TO POSTS FIRST: On a level surface, arrange two posts on the ground. Set a long board on top of the posts and line up one end so you can nail it together. Attach the board to the post using two nails. The edge of the board and edge of the post should line up. Do this for all long boards. If you’re making square beds, construct opposite sides first and place all sets of opposite sides together after construction. The reason why this matters is that two boards on each bed will be flush with the posts. The remaining two boards will act as caps and cover the ends of the other boards. See the image above to study the corner and end of the bed.
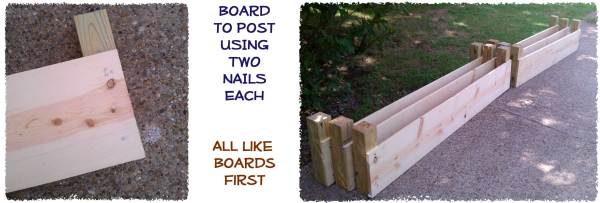
ATTACH END BOARDS LAST
- FINISH THE BEDS! Line up two opposite sides of one bed. Stabilize the post with your foot (wear gloves and boots or closed toe shoes). Nail the end boards onto the posts, covering the existing board ends.
For a cleaner finish, final boards cover the ends of the first boards.


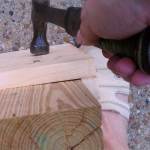
TIME SPENT: Each bed took me 20 minutes to build. I took lots of breaks. It was hot and humid outside. All the beds can be made in one day, by one person with just hammer and nails. If you decide to screw the boards in later, drill a pilot hole first before placing the screws.
Visit me on Facebook to see my progress, ask questions and hang out with other gardening geeks like me!

So, what am I growing in the raised beds fall and winter 2014?
- Asian and Mustard Greens Tatsoi, Mibuna, Mizuna, Red Russian Kale, Red Giant
- Beets
- Brussels Sprouts
- Carrots – purple, round and regular
- Chives
- Claytonia
- Cress
- Garlic
- Kale
- Kohlrabi – purple and white Make chips from the leaves!
- Lettuce
- Mache
- Mesclum
- Parsnips
- Shallots
- Sorrel
- Swiss Chard
.