Popsicle sticks work just fine in the garden to mark plants but when that creative streak strikes, use what you have around the house and found objects to bring new life to your labels.
Tree Slices and Galvanized Steel Wire
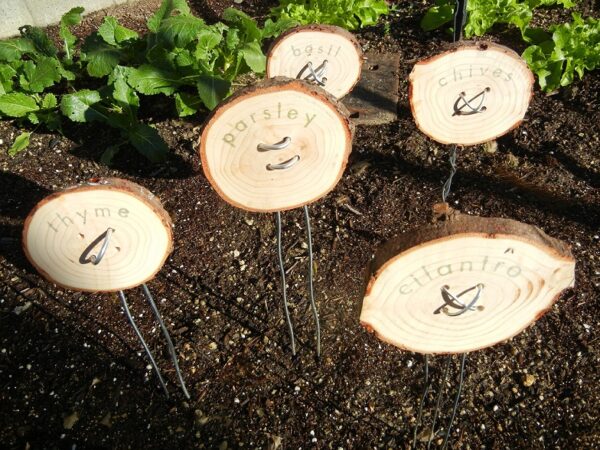
 WOOD: Recycle your Christmas tree or other solid wood trimmings into garden markers. Simply slice the trunk into 1/4″ – 1/2″ thick disks. The examples in the photo are 3″ in diameter.
LETTERING: Common herb names are stamped directly onto the untreated wood. Use permanent ink to ‘stain the grain’. Position clear stamps on an acrylic mounting block, adjusting each letter so that it follows the natural curve of the sliced wood and fits nicely on the chosen disk. Ensure that the ink is evenly applied. A friend suggested I use a wood burner to emphasize the letters. A nice idea for a future batch.
SUPPORTS: Drill holes in the middle and insert 9 or 14 gauge wire through the holes, making sure the wire is long enough to balance the weight of the tops both physically and visually. A good length is 12″. Have fun with the supports by changing the wire design. Weave the wire through the holes differently or braid the more supple wire.
FINISHING: Spray your new markers with a light coat of matte varnish or brush on marine varnish.
Polymer Clay, Bamboo Skewer and Hemp Twine

CLAY: Ultra Light Sculpey (Polymer Clay) is a wonderful medium to work with. It’s easy to roll and shape. It’s not as heavy as traditional polymer clay and this makes it easier to attach to dowels or sticks without worrying that they’ll be off balance and topple over. To create the markers above, cut rectangles out of flattened clay and smooth the edges. You can use clay tools or items you find around the house to texturize the edges.
LETTERING: Press stamps into the clay to emboss the names of vegetables and herbs. Take a fine pointed paintbrush and create a light, watery wash of acrylic paint. I used a watered down burnt umber. Brighter colors didn’t look as natural. Carefully brush the paint into the impressions and wipe away any extra pigment with a damp cloth.
SUPPORTS: Make notches in the clay where you will wrap the twine (before baking the clay). Once the baked clay has cooled, also make notches on the bamboo skewer to ensure the label won’t slip off over time. Match the notches up on the bamboo with the clay notches. To attach the labels, wrap several criss-cross layers of the hemp twine around the bamboo and clay, leaving enough of the twine from the start to securely tie off the end.
DESIGN IDEAS: The clay forms you see here also have graphics stamped randomly on both sides. This is an optional step but gives you endless possibilities. Use objects you find around the house such as forks, screws, costume jewelry.
TIPS: If you want both sides of the marker to look good, place design objects on both sides of the clay simultaneously. If you only do one side at a time, the opposite side will be ruined. Keep the bottom object intact when pressing the letters into the clay.
I personally bake the clay 10 minutes longer than the directions suggest but use your own judgment when firing the clay at home. The package recommends 275 degrees F and 15 minutes for every 1/4″ of thickness.
FINISHING: Spray a light coat of varnish on the markers. Polymer clay will stand up well in rain and sun even without varnish.
Railroad Spikes with Polymer Clay Impressions of an Antique Butter Mold

You may not have railroad hardware lying around but check the junk drawer or the garage for giant bolts, nails or old tools worthy of the garden.
STEEL: I would like to take a blacksmithing class and learn how to stretch and shape these old railroad spikes. Until then, I decided to add a tag using polymer clay.
DESIGN IDEAS: After some experimentation, I ended up using an antique butter mold to make the tags. One quadrant of the mold worked well. I just smoothed out the edges before baking.
LETTERING: This example shows how I stamped a single letter on the front but I have a set that has no text at all. I can write plant names in fine permanent marker on the front or back of the clay tag.
FINISHING: Spray a light coat of varnish on the finished product.