Solar ovens are fantastic fun for all ages. It’s a special thing to be able to cook your own food without electricity. Our giant solar oven in the school garden was all the rage. Classes would pass by and peer inside, watching the temperature gauge rise and veggie chips crisp up.
We couldn’t afford to buy a premade solar cooker – they can cost hundreds of dollars. After studying how solar ovens work, it was obvious that we could make our own for about $15.

We thought about using a pizza box but we wanted more space and guaranteed higher temperatures to kill off bacteria and achieve crispy veggie chips fast. Pizza box solar ovens require more sun and more time. On a perfectly sunny day a pizza box oven may reach 200 degrees Fahrenheit (93 degrees Celsius). That’s good! But we wanted to go bigger as an experiment.
Here’s How to Make Your Own Large Solar Oven Plus Ideas for Snacks and Recipes
TWO BOXES: You need an inner box to cook in and an outer box to serve as the insulated shell.

Don’t have perfectly sized boxes? No problem. Piece together the outer shell with cardboard scraps using a glue gun.
WINDOW: The see-through window was a budget challenge. I was too cheap to buy plexiglass at the home improvement store and a frame shop wanted $75! I re-purposed a plastic poster frame and attached it on one side with duct tape.
Lesson Learned: Don’t get intimidated by making it perfect. You can patch and adjust. It adds to its character!
INSULATION: There should be a 4-6 inch space around the perimeter of the inner box for insulation. I didn’t use foam as insulation because it can release higher levels of fumes than paper. I used packing paper and shredded cardboard instead. You can also use newspaper. It”s a good idea to also add paper under the inner box for insulation.
BAKING PANS: Cast iron or dark pans work best. Foil pans will only reflect light back out. You can preheat the oven with the pan(s) inside and take it outt with pot holders to arrange the food you will cook, reducing cooking time.
REFLECTORS: I did go to the dreaded “‘dollar store” to pick up two car sun shields. Update: the next solar oven I will use mylar-like safety blankets purchased for about one dollar each. These will be attached to cardboard flaps around the oven
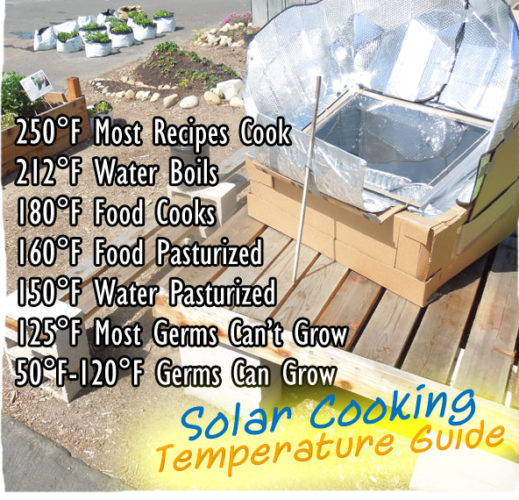
TEMPERATURES: Researching temperatures, I discovered some key benchmarks. The most important for me was the minimum temperature to prevent germs from growing, around 125°F. I also learned that even if my cooker only reaches 140-150°F, I can still cook lots of foods – just need to keep them in longer. Get yourself a temperature gauge – an inexpensive meat thermometer will do.
PREHEATING: The oven can be placed on the ground but we prefer to raise it up for easy access. Students can pass by and see what’s cooking easier and there is less risk that pests will try to crawl in. We get it out early on a day we’ll cook because it needs to preheat, just like a regular oven. The best hours to rev it up are between 10am and noon. We usually start preheating at 10am. By 11:30-12:00 it reaches 140-160°F depending on the weather and cloud cover. We start to cook once it reaches at least 140-150°F.
WHAT TO COOK: We like cooking veggie chips using kale or kohlrabi leaves. Did you know kohlrabi leaves are edible? My kids like them better roasted than kale chips! In a preheated oven, it usually takes only 30 minutes to roast the chips.
More Lessons Learned: This box barely fits through a door. It helps to have someone else to carry it around. Think about how you will store and transport the oven. Being able to remove the reflectors without too much hassle might be important. I carry around a packing tape dispenser with me just in case I need to adjust the reflectors with the tape or patch a dent.

KALE CHIPS RECIPE IN A SOLAR OVEN:
Preheat your solar oven for at least an hour. Simply separate the leaves from the spines creating the largest sections possible. Compost the spines. Wash and dry the leaves, then toss in a tiny amount of olive oil and sprinkle with sea salt to taste. Arrange on a single layer on an ungreased, dark baking sheet. Takes about 25-35 minutes in the solar oven depending on your weather conditions. It took 30 minutes for our kale to cook just right in Southern California on a warm, spring day with no clouds.
BAKED APPLES IN A SOLAR OVEN:
Peel and chop 5 Granny Smith apples into medium sized chunks. Add to a container with a lid. Add 1 tablespoon raw sugar, 1 and 1/2 teaspoons cinnamon and 1/4 teaspoon ground cloves. Close the container and shake gently to mix. Let marinate for at least 15 minutes. It can be prepared a day ahead. Sque eze a little lemon juice into the mix if you don’t want the apples to turn too brown. I don’t bother.
Preheat the solar oven for at least an hour. Spoon chopped and marinated apple into cupcake paper or foil cups. Place the cups on a baking sheet preferably dark-colored. (You can preheat the baking pan for faster cooking. Cook in the solar oven for 45 minutes or until desired tenderness. Makes approximately 18-20 cups filled half way.
BAKED HOMEMADE CHOCOLATE DOUGHNUT HOLES IN A SOLAR OVEN – Renamed Cake Bites at School
These barely sweet chocolate treats are a cross between a doughnut hole and a cake ball.
Ingredients
- 1 3/4 cups flour
- 2 teaspoons baking powder
- 1/2 teaspoon salt
- 3/4 cup cocoa powder
- 1/3 cup fine sugar
- 2 tablespoons butter
- 1 egg
- 1/2 cup milk (not skim)
- 1/2 teaspoon vanilla extract
If possible, make the batter a day ahead or a few hours before cooking. Cool in the refrigerator for easy rolling.
1) Preheat your solar oven.
2) In a large bowl, combine all dry ingredients 1-5.
3) Mix in softened butter 6.
4) In a medium, separate bowl, combine all wet ingredients 7-9.
5) Add wet to dry.
6) Shape into balls (flatten them at cooking time if your oven will be at an angle to prevent them from rolling).
7) Try to get your oven to at least 140-150°F. Place balls an inch or two apart on a lightly greased, dark pan. I used a light coating of cooking spray.
8) Bake until firm but not crispy. It took 45 minutes in our oven on a sunny, warm, spring day with no cloud cover.
Remove with tongs onto a cooling rack or cookie sheet with paper towels. OPTIONAL: Drizzle with a frosting glaze made from 1/2 cup powdered sugar and 1 tablespoon milk.
Makes about 20 regular size doughnut holes or 40 tiny “bites”.